Saturday 1 November 2014

Apple Cake for All Saints Day


This is one of my favourite cakes. I don't make it very often, but in the last few years I have made it on November 1st, maybe because it's such a contemplative recipe. It's you, a bowl of apples and a couple of hours in the kitchen. But don't worry, it's worth the effort. Today I'm making two cakes as I'm giving one away. I think the best cake tin for this cake is a plain round one, but mine has gone missing. So I'm relying on an old bundt (which also works beautifully, but do use small apples or they will stick to the inner core of the tin). It takes time but it actually quite easy to make.
Granny Smith apples work best for this recipe. Other apples fall apart. Core your apples. Your apple size will depend on the size of your tin. Because I am using a bundt tin, I have opted for the smallest apples I could find and they really are little. This makes coring them a little difficult, so take your time. You want a nice, neat cored out shape. And if you can, try to make the bottom hole of the apple as small an exit as possible. Flesh out the middle, but keep the bottom smaller. 
Now, I don't now about you, but I can't find an apple core-ing tool for love or money! I have been through 3x in the last 12 months alone. The handles just completely separate from the metal corer and it's a real nuisance (it also always happens when the tool is stick in the apple so you have to cut it out too). I'd really love to find an apple corer that works, so if you know of one, please let me know. This tool I'm using here - I don't even know what it is.I found it in our cutlery drawer and it nicked all my fingers which reminds me that I need to find one.
In a pan, add your cored apples and gently stew/steam them for about 10-15 minutes in about a cup of water and fresh lemon juice. It's really important that you don't over stew the apples or use too much liquid, you want to lightly brown and soften them, without them going to mush. This is the hardest part and requires patience and care.
They should be just starting to tender but firm enough to stuff without falling apart. Whilst your apples are softening, make the apple filling. Now, there is no recipe for this. You make it according to taste. Simply mix walnuts (any nuts will do), vanilla extract, lemon zest, cinnamon and sugar to taste. I use brown sugar and I use very little because I don't have a taste for sugary things. Just mix it all together until it makes a delicious firm filling. I usually add just enough butter to make all the ingredients combine. I mix mine up in my Ninja.

Everyone always wants to know how I like my new Ninja. Well, it's fine. I'm trying to downsize my kitchen and the Ninja was a good choice for me. I do like it and it's useful in many ways, but I will just warn you that the blades are lethal. Everyone who touches it somehow seems to cut themselves and I've done that myself a few times too. Wash it straight away because the blades are difficult to clean. This seems so obvious, but I've never had a kitchen tool inure so many adults before. I think it works great, but I wouldn't have it in a household with a child or teenager. It's just too sharp. 

 Butter the cake tin and stuff your softened apples with the nut fulling carefully, keeping apples intact. Make the cake batter and pour over the apples, about 3/4 high in the tin, just covering the apples as the cake batter will rise a little.

November Apple Cake Recipe
Stuffing: nuts (about a cup), vanilla, zest of 1 lemon, vanilla, sugar, cinnamon and butter to taste. Mix all ingredients together into a firm paste. 

Cake mixture: (my DD used packet cake mix with this recipe when she ran out of ingredients, and it was delicious, so don't be afraid to experiment. Any good cake base mixture will do.) The real work is in the apples. 
  • 1/2 lemon squeezed 
  • 225g butter, softened
  • 280g golden caster sugar
  • 4 eggs
  • 2 tsp vanilla extract
  • 350g self-raising flour
  • 2 tsp baking powder
  • Heat oven to 180C/fan 160C/gas 4.
  • Place the butter, caster sugar, eggs, vanilla, flour and baking powder into a large bowl and mix well until smooth. Bake for 35-45 mins (depending on oven) until golden and springy to the touch. Leave to cool for 10 mins, then turn out of tin. Cut into slices.
Lovely

I don't feature many recipes on this blog, simply because I don't bake all that much. However if you are interested in what I call 'old fashioned' recipes like this, you might like to visit the Mennonite Girls Can Cook Blog. I love it over there. And don't let my definition of 'traditional' put you off. When I say traditional, I mean honest ingredients and real cooking. Mind you, they have a lot of easily prepared dishes too and when I'm stuck for dinner ideas, I like to pop in and inspire myself. They cook the way I eat so it's easy for me to 'find something for dinner.' And I'm so grateful that they're there because when my DDs can't find my 'old family recipe book' they just check out the Mennonite blog, they always find what they're looking for. 

Happy baking :) 

Wednesday 29 October 2014

WOW: The Romance of Detail

WOW = WIPs On Wednesday


When I posted my Vase details a few weeks ago, a few of you commented on the polka dot fabric I had selected - it's gorgeous isn't it? But that's not the only reason I selected it for the LE vase. The reason I choose it is because of the story behind it: like LE, it's full of romance and mystery - its a scrap from an old antique wedding dress. I've had this scrap for over 20 years, I could never throw it away or use it on just anything - I knew that one day it would find its home somewhere special, and now it has.

When I took possession of it, it was already old and it's actually older than I am. I love the whimsy and romance of it...and then there's the polka dot element of it - who can resist a polka dot? Not me, that's for sure.
I backed this fabric with a beautiful beige silk and stuck it down with basting spray. When it was in position as the vase, I hand sewed it down to keep it anchored. I love it when fabric has a story to tell. It makes no difference to me whether I know that story or not - material from an old wedding dress is very special material indeed and is perfect for Love Entwined; it just adds another layer of mystery to what is a love inspired evocative quilt. 
What's Your WOW ?

Monday 27 October 2014

Are YOU Coming to AQC 2015 ?!

YES IT'S ALMOST TIME!
Secure your place by clicking YES I would like to book a class OR click on the button at right OR on the AQC website. The link will be active from 10am (AEDT), Tuesday October 28.
Remember there are limited spaces for each class, and they can fill quickly so we encourage you to book early to avoid disappointment.
This year we have an all new booking system for the classes which is easy to follow. Make sure you have your AQC class timetable beside you.
This year there are three important changes to note with the class bookings:

1. You will NOT need a password to book online.
2. Visa and Mastercard ONLY will be accepted as payment for online bookings. Confirmations in class are subject to available funds on your credit card. If your card payment is not able to be processed, your place in the class may not be held.
3. All registrants will need an email address to book via the online booking system. If you are completing an additional registration for a friend:
They CANNOT use your email address
If they DO NOT HAVE AN EMAIL address please substitute with the following information when their email address is requested:
firstname.lastname@noemail.com (eg. jo.flow@noemail.com)
The primary registrant for this application (YOU) will receive all email confirmations for all bookings in the order.

CLICK HERE FOR
PRINTER-FRIENDLY VERSION

Saturday 25 October 2014

LE: The Double Bow Border

The double bow border is actually the first thing I noticed about the original quilt in 'patchwork' so this border is very important to me. I've created a 'double bows' box, just like I did with the 'zig zags' and this is a box that has everything I need for just this section of the quilt. I know I've said it over and over, but this quilt is a practice in preparation, so here I am preparing. My favourite part of the quilt is when I reach those stages when I can just grab my 'section box' and pull out the prepared pieces, position and play around with them. But to reach that happy moment, there's work to do first. A lot of work. You can't make it as you go, or you'll fall into chaos. Step by step and prep by prep. It's the only way to keep your order when working on a once in a lifetime quilt like this.
bows and swags in alternating hues of light and dark
I mark my patterns with arrows to show me which way is 'up' when I position just in case I want to fussy cut. I have a few dewbies or 'triangles' from Part 8 floating around too (above) as I will incorporate the swag and bow fabrics elsewhere in the quilt in tiny areas throughout to keep the whole scrappy looking harmonised.
Here's my lights and darks double bow box with my selected fabrics at the ready for prepping 
I love all the fabrics
And I've even started fussy cutting. I learnt early on that you have to do the parts which appeal to you whilst they appeal to you. I can't schedule my available time ' to fussy cut for the bow border'. I wish I could be so disciplined, but I find that if I'm not in the mood, I won't do it or if I try it will look all wrong and that ends up being a waste of my precious sewing time. So I work on whatever takes my fancy that day. This is why I'm working at numerous sections 'at once' and why I'm working back and forth between all the parts that make the pattern. I have my own methods and this is what works for me. I think that if I did it any differently, I might never finish. 

Fiddling, sorting, working, enjoying...
How do you organize your preparation time?

Friday 24 October 2014

BQF: Love Entwined: 1790 Marriage Coverlet


Many thanks to Amy for so generously hosting the Bloggers Quilt Festival once again and a warm welcome to any linky hoppers who might be here for the first time. Welcome to my blog! Please consider leaving me a comment and come back again soon. 

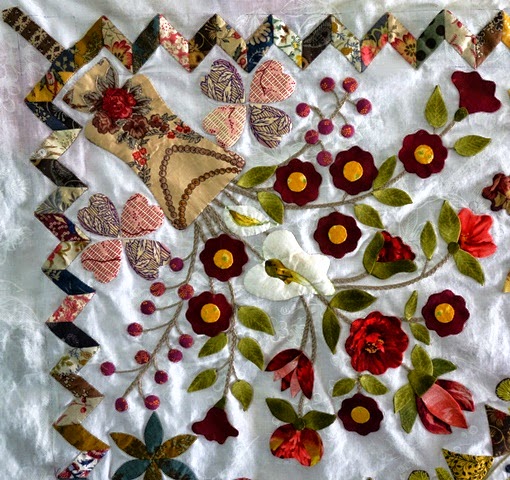
This is the first vase from the centre of my applique quilt, 'Love Entwined: 1790 Marriage Coverlet'. It is an heirloom applique design and is a homage in remembrance to the original coverlet of no name, known simply as a 'fine marriage coverlet dated 1790' in Averil Colby's publication 'Patchwork' of 1958.

This is a heritage quilt; completely and intensely devoted to applique. There's a lot of mystery and intrigue concerning the original coverlet - the unknown maker used motifs and elements not seen in her era and this has raised a lot of mysterious and intriguing questions regarding her place in society, the origins of the quilt design and her intention (and application) in making it. From the moment I saw this quilt, I recognized it as an extraordinary Georgian masterpiece and knew that it had to be revived and remembered for it's unique place in history. 

In 2013 it was all but forgotten. But not for long. I set about creating a pattern in remembrance to it and the unknown woman who made it. Once I had the pattern created, I wanted to ensure that this quilt and its motifs would be revived and recognized today - so I released it for free as a BOM over a period of 18 months. This month, October 2014, marked the final installment. Did you miss it? Don't worry, all the parts are now available for free download. Yes, this quilt pattern is available to anyone who is interested in making it, for free

Why? Because I want to see this quilt and elements of its design revived and remembered. 

This quilt is so intense and fussy that I couldn't possibly show you all my favorite details in one post. Of course I'm biased, but I think every detail is wonderful! So I'll just focus on a few details of the first vase.
What I really love about this quilt, is that it is so intricate and busy. That's not usually my style. But I have found that as I spend hours working on certain motifs and pattern details, my mind starts to wander and wonder about the original maker. What was she thinking? How creative she must have been! Surely this quilt would have been the talk of society in her circle! For its true, we know so little, but what we do know (or can at least be confident) that she must have been of a certain class and society in Georgian England to have access to this hobby, its design process or purchase, its mathematical elements and the fabrics used. It's such an intrigue!

And once you start devoting hours to this quilt, well, you just can't stop.

This quilt really has a personality all its own. And every block is so intricate, you can really dress it up with all your skills and interests. There's plenty of room for fussy cutting, embroidery, embellishment and broderie perse. I'm sure a few charms here and there wouldn't go amiss either.

Then, when you've selected an area to work on, you have the pleasure of reinventing it to suit yourself. Take this vase for instance - I fussy cut it from a wonderful fabric
And yet, that still wasn't enough - it wanted more attention. So I spent several days embroidering very simply around the main design lines for that something extra
and as you can see, it transformed my work from beautiful to heirloom. But what I really love is that when I make this quilt, I am a part of history, taking part in it and contributing to it. I wonder what our unknown maker, in 1790 would think if she could see me now... I can't even imagine!

What I do know is that this quilt really shines when you pay attention to it, the more the better, And I can see it being worked for hours, weeks, months and probably years - one hour at a time in the drawing rooms of fine estates in Georgian England. I really wonder how many fine homes the original 'visited' as it was being made. You can probably tell, this quilt is dear to my heart and I love sharing it with others.
Love Entwined:1790 Marriage Coverlet is a work of art, a piece of history and an epic applique masterpiece! I am hand sewing the whole quilt and using turn edge applique as my method alongside wash away fusible. Of course, it lends itself to raw edge applique too and from Averil Colby's description, there certainly is raw edge on the original.
 Thank you for visiting my blog today and for viewing my post on this very special quilt. 

Wednesday 22 October 2014

WOW: LE Centre Done!

WOW = WIPs On Wednesdays 

I have reached another WOW stage in the LE journey

I had no idea what I started when I released Love Entwined. It's been an epic journey for me and I'm really pleased to finally have the centre completed.Yes, there's a lot of work ahead, but for the first time, I can see the end in sight. With the centre done, I feel suddenly much more relaxed about this quilt. I am completely content now to just move ahead with my own version of LE and maybe even start thinking about releasing my next BOM.


Yes, my Love Entwined center is done. This image is a bit dark and moody, the lighting conditions aren't great at the moment but I couldn't resist taking a picture anyway. Although the colours aren't showing up as true, I still think its incredibly beautiful. So, now I have two weeks hand sewing (if I sew 8 hours a day, 5 days a week) or 4 - 6 weeks at a few hours a day in the evenings. I think what this means for me is that I will start moving ahead with the borders and prep work for the blocks ahead and keep the hand sewing task as my 'break' work. 

Love Entwined, I can't believe I'm finally here. It feels like just the other day that I was thinking of drawing you up as a pattern! This is my most intense and time consuming quilt, ever. What can I say? I love the adventure and mystery of this quilt. 

What's Your WOW ? 

Tuesday 21 October 2014

Meeting the 1st Love Entwined!

Last week I blogged about Narelle Birchall and her LE - she is an extraordinarily talented quilter and the first person, as far as any of us know, to have finished Love Entwined. Am I serious?! Yes I am! Just thinking about it leaves me a little breathless. But Narelle isn't just talented, she's also generous and giving too. Last week we met up at Quilts in the Barn over in Wonga Park and I was able to see her work firsthand. This has been the first moment I've had to blog about the whole experience.

Oh my.
(L-R) Narelle, Brenda Papadakis and yes, that's me grinning in admiration and awe. It was cramped in there for a quilt as big as LE, but we were keen to unfold it and have a look at its beauty and it wasn't long before everyone present was desperate for a better look...
So it was taken outside and pegged to the tennis court fence. It was an incredibly bright day and the glare was overwhelming for me, all my photos turned out blank or washed out and I got one of those instant sun headaches, so I was very grateful to Linda who knew my camera better that I do and put it on the right setting so that I could capture a photo with Narelle in front of her majestic quilt. We are both somewhat stunned by the light in this image, but I think you can see how spectacular Narelle's Love Entwined is. Narelle, you are talented beyond words.
I can tell you that it truly is spectacular and that Narelle has accomplished years worth of work at a rapid pace. And yet, it's incredible in every way. Her fabrics, her workmanship, everything just left me speechless.

I'm already at that stage with Love Entwined, where I just don't know what to say about it anymore. It has been an epic and heartfelt journey for me and I feel in many ways that I have done what I felt I needed to when I started this project. With the last installment released this month, I feel somewhat 'finished' emotionally with the drive that was needed to release it. From this point onward, it belongs to whoever makes it and takes on its own character at each hand. Seeing Narelle's quilt made me fully 'realise' that this quilt is out there in the world now and this leaves me deeply contented.

Did I mention Narelle's excellent workmanship? She really is talented. This is perhaps the most difficult block in the entire quilt and she has made it look effortless and simple.
It's very difficult to photograph a quilt like LE because there is so much detail and these details are not distinguished in overall quilt front pics. So here is a close up shot. I can tell you first hand that every inch has been made extraordinarily well, this quilt is a masterpiece. 
My deep thanks and gratitude to Linda who allowed us to unfold LE and then peg it on the tennis courts, and for taking the images I am in when I couldn't manage my own camera (honestly, I'm hopeless with those things), and to Brenda Manges Papadakis (that's a whole other post!) and of course to Narelle Birchall - its incredibly generous to take the time to show your quilt and to have allowed me to see it in real life. Thank you so much for thinking of me.

Yes, Love Entwined is officially out there. What do you think?
Related Posts Plugin for WordPress, Blogger...