As you can see from the skirt panel below, it's too large for even my desks and benches to handle so there will be a lot of cleaning going on once the real fabric makes it into the house. As for now, I'm just making the toile so am feeling relaxed about any dust.
Tuesday 26 July 2016
Starting the Wedding Dress
Can you believe that I really never imagined I would sew my own DDs wedding dress one day? I really didn't. But now that I've started, there's just something so exciting about it all. I actually made my own wedding dress when I married and it was gorgeous. I didn't even use a pattern, I simply drafted it by eye and set to work. Unfortunately I don't have a photo of it. It was so long ago that the only photos from the day are from the shoulders up! That fact seems so strange nowadays with the technology bombardment we all live in and when I think about it that way, it's really staggering how much the world has changed since then. As for the dress itself? Well the less said about that the better. My own sister harvested it for the fabric years after I'd left home which left me with no dress to show off to my own DDs. Anyhow, it looks like I can make up for those lost bridal fabric, style and headdress moments now...from scratch.
Well almost. I naturally thought I'd be drafting the entire pattern myself, but after much shopping and trying on of dresses which just didn't meet the mark, my DD found the pattern she wanted and has been very particular about it all. As a professional designer in a previous life before quilting, I know there will be many changes and adjustments, however I'm happy to start with the pattern as the base dress to work from. With my first DD showing zero interest in wedding bells, I have seized the opportunity to relish every moment of this dress making adventure with my youngest.
The pattern is a Butterick one, and oh boy is the paper quality poor! I'd happily pay double for more manageable paper and I'm surprised these paper sheets pass quality control (if there is any?), it's been a pain to gently unfold, iron and construct the pattern. Was it always this bad? It's been over a decade since I even handled a commercial pattern (perhaps longer) and it may just be that I've grown old and fussy. What I had to do to make the pattern usable was adhere it to a backing support fabric. I didn't have any on hand and didn't want to leave the house and lose momentum so I used an expensive woven fusible manufactured for men's suiting I had in my studio. I probably shouldn't have but it is lovely to work with and I can't see that I'll use it for anything else.. so I just decided to use the whole bolt up. And that's the pattern constructed. Now the fun can begin..
As you can see from the skirt panel below, it's too large for even my desks and benches to handle so there will be a lot of cleaning going on once the real fabric makes it into the house. As for now, I'm just making the toile so am feeling relaxed about any dust.
Now, I'm off to tape up my wooden design bench to prevent any future snags when billowing the lace and fabrics and then I'm going to resume my search for a dress maker's dummy. I gave it away last year during a bout of downsizing and clearing out, I never imagined that I would need it again - so I'm off to buy an adjustable one. That's life, eh?
As you can see from the skirt panel below, it's too large for even my desks and benches to handle so there will be a lot of cleaning going on once the real fabric makes it into the house. As for now, I'm just making the toile so am feeling relaxed about any dust.
Wednesday 20 July 2016
WOW: The Downsizing Lesson
WOW = WIPs On Wednesdays
Little did I know when I happily gifted away my dress maker's dummy, that I would need it a year later. I thought I was being so practical. The only things I sew these days is shirts for myself and the occasional set of curtains when I find some really special fabrics. So it made sense, during my downsizing tidy out, to give it away. I mean, yes I do sometimes make myself shirts - but I don't need a dummy for that. I had no idea that one year on from my great big clear out I'd be online looking for a dummy to make my DDs wedding dress on.In fact, I really don't think that I ever even considered making my DDs wedding dress. But there you are, life takes turns you don't expect. And when you can't find exactly what you want, mother knows best (and can sew) so here I go.... but first, my search a dummy continues. I don't want to own one, but there are no options to hire one and no one I know has one. So, wish me luck :)
What's Your WOW?
Tuesday 19 July 2016
Hazel is Finished
That's it! The last installment of Hazel is up in the Group and there are already plenty of quilt top pics circulating to feast your eyes on. What a BOM it's been! When I designed it, I loved it, but I didn't know if anyone else would love it too. An all pieced BOM is a bit out of character for me, but sometimes I do feel like I just need to shake things up a bit. Now all I have to do is wait around a bit longer to enjoy even more Hazels hit the finish mark. And finish my own top... which is completed and needs to be quilted.
The best bit (and I know I always say this, but it's true) is the scope of variety out there. Take this one, in stunning red, blue (some tan) and white by Milla Machova. Now, when I first designed Hazel, I did do a mock up in this scheme and secretly hoped that someone somewhere would make this bold statement and I'm so glad Milla did because I'm thrilled with it. It might sound odd to be so delighted over someone elses quilt, but as a designer it's a very real emotion!
This Hazel is by Judy Hogg and the her use of colours is a dream, I just love the balance between the lavender and green, it's so harmonious
This one by Alice Means is splendid in red shades and you know red happens to be a weakness of mine..and the smattering of green just works so well, I am in love.
The best thing about the BOM Group over on Facebook is the ease of sharing images, it's been such a thrill to see everyone working at their own pace. For this post, I asked Milla, Judy and Alice for permission to post their quilt images here as examples of three very different quilts. The fact is, I could have listed 50 quilts here on this post right now - there's a Fassett one that has stolen my heart, a pastel one that is too charming and a very special shaded one that has managed to use all my favorite colours better than I have ever managed. Yes, it's true, I really do get to live through everyone elses colour schemes...which is lucky for me as I'm notoriously indecisive myself.
If only I could show them off here - but there's not enough blog space, you'll just have to join the Group and see for yourself.
As for me, I'm keenly following the results of the next Free BOM Poll over in the Group to see what members would like to make next.
The best bit (and I know I always say this, but it's true) is the scope of variety out there. Take this one, in stunning red, blue (some tan) and white by Milla Machova. Now, when I first designed Hazel, I did do a mock up in this scheme and secretly hoped that someone somewhere would make this bold statement and I'm so glad Milla did because I'm thrilled with it. It might sound odd to be so delighted over someone elses quilt, but as a designer it's a very real emotion!
This Hazel is by Judy Hogg and the her use of colours is a dream, I just love the balance between the lavender and green, it's so harmonious
This one by Alice Means is splendid in red shades and you know red happens to be a weakness of mine..and the smattering of green just works so well, I am in love.
If only I could show them off here - but there's not enough blog space, you'll just have to join the Group and see for yourself.
As for me, I'm keenly following the results of the next Free BOM Poll over in the Group to see what members would like to make next.
Saturday 16 July 2016
'The Pomegranate' Pattern is Launched!
"Pomegranate", finished size 24 x 28 inches (61 x 71 cms)
It's here! I've finally managed to release the pattern for this quick little beauty and I'm delighted about it. It's been a long time coming - I've been asked for years when I would get around to releasing this wall quilt and now it's finally done. That's another WOW for me, another WIP completed. Phew!
So what do you think? are you in the mood for a weekend project? This wall hanging is perfect for those of you with a hankering for an applique project you can show off around the house or quilt as a heartfelt gift. I have mine in the lounge room and I've literally lost count of the compliments it's received over the years.
Why a pomegranate? The pomegranate is steeped in a rich history of mythology. Traditionally representing abundance, fertility and luck, it has been depicted in countless textiles through the ages as a representational ‘charm’ motif. What better design for the home than a wall hanging featuring this fruit in abundance?
I opted to make my own in reds because it just appealed, however the design lends itself to a wide open interpretation (I’ve even got one in my WIP pile that is made up from newspaper print fabric, just for a bit of fun).
Whatever scheme you go for, don’t be surprised if it turns out to be a new favorite—when I made this wall hanging, I had no idea how enamored people would be with my naïve little vase and it motivated me to go and design a a series of them (which I haven't created yet, they're WIPS).
'Pomegranate'
Finished Size 24 x 28 inches
Pomegranate is available as a digital pattern, in PDF format for easy home printing in A4. Once payment through Paypal has processed, your download is instantly sent to your email in-box. (Be sure to check your spam and junk folders if it doesn't arrive within 3 minutes.)
Digital Pattern Download
$9.95 USD
Thursday 14 July 2016
Sweet 2016, Part 6: Opera Cake
Here's where we are up to, quilt wise:
You can see that I'm still pinning my applique pieces onto the constructed paper pattern because I have far too many backgrounds and the indecision is driving me crazy. I've purchased 8 backgrounds and I already 4 possibles from my stash, so I'll just wait and decide at the very end.
Here's how I made my Opera Cake this month: at this stage, the fabric requirements are scraps from your chosen range. Here's my range for making up this month.
There's no getting around the always essential prepping of each little piece (and numbering too)
Looking good
My Opera Cake!
Understanding the pattern release schedule: anyone can join Sweet 2016 at any time and when they do, they will receive a new block each month from that point onward. The day they receive each new block will depend on the date they signed up and made their first payment. Everyone who starts Sweet 2016, starts at the beginning, Part 1. Specific blocks cannot be purchased out of turn.
Whenever you choose to start this BOM, be sure to keep us updated on your progress by sharing your work over in our Sweet 2016 BOM Facebook Group, see you there!
'Sweet 2016' is my current Mystery Applique BOM
It's just $3.95 per month
Delivered digitally, to your email inbox each month
Wednesday 13 July 2016
WOW: Pomegranate Anyone?
WOW = WIPs On Wednesdays
I've been taking many trips down memory lane this past week - you see I've been clearing out my sewing studio and making room to create the space I need to sew a wedding dress (but more on that in another post!). It's been a good time for me to pull out those patterns that are three quarters finished and create a kind of priority list for my design WIPs.
I found two Pomegranate wall hangings half completed (not counting the one above which is hanging in my lounge room) and they are really fabulous. I just love finding projects I am still in love with, it's a good sign. Anyhow, I will be releasing the pattern Pomegranate this week after WOW so if you've ever wanted to make it, don't forget to visit on Friday. Once again I will be allowing members to download new patterns to my online shop at the very reduced price of $4.80 for 48 hours - it's a small window that allows anyone who's interested to take part at a discounted price.
And of course, today I'm working on a rose (what else?) themed wedding quilt which I expect to release next week. It's a busy time in my house and I can't wait to share more with you just as soon as I get to the next step.
What's Your WOW?
Tuesday 12 July 2016
Meet My Quilt: Peony Pride
Back in 2007 I wanted to create a modern quilt that had all the traditional elements I loved from those quilts of a bygone era - it had to be simple, be floral and make an impact. As a textile artist long before I was a quilter, I was completely comfortable with the idea of stenciling - even though those around me weren't so keen in my newfound interest and I couldn't find any like minded quilters to share my passion with. Not that this put me off, I was determined to see through my own personal stenciling challenges.
You see, I think that stenciling is ahead of it's time - way ahead, and I do think that one day it will get the respect it deserves- I hope it happens whilst I'm still quilting as I feel it's long overdue. It's especially odd to me as stenciling is not some new 'fad' but is up there with heritage quilting techniques - it's been with us since those very first New England quilts so there's no reason to avoid it for the sake of sentimentality.
I got the urge to create Peony Pride because I wanted to create a 'classic' quilt which was completely stenciled, and by doing so challenge the idea of what 'traditional' could mean for a quilt. I decided to just make a go of it and keep it simple. I designed Peony Pride in a single afternoon after flicking through my design journals and I have to say, looking on 9 years later, it still feels relevant and 'now' and yes, I would make it all over again. I still love it.
Sunday 10 July 2016
Let's Stencil: Learn How Right Now
Let's Stencil: The Tulip
------------------------------
Materials:Cutting mattTracing pencil
Permanent fine marker
Craft cutting knife or scalpel
Sharp scissors
Paper towels
Stubby paint brushes for stenciling: I like using round brushes, size 8 & 10
Small containers for mixing up colours
Freezer Paper ( I use Reynolds Brand)
Acrylic or textile paints (textile medium if applicable)
Extra fabric for experimenting
Plain background to be stenciled, approx a 12 ½inch block, however the size isn't as important as this workshop is focusing on technique.
Whichever acrylic paint you choose, ensure that you use Textile Medium unless specified otherwise by the paint manufacturer.
Textile Medium helps paint adhere to fabric—for better setting, and is always recommended.
------------------------------
A stencil pattern is what you create when you cut out selected segments (holes) from a design according to a line drawing. Starting with the line drawing that you want to turn into a stencil, trace this line drawing onto freezer paper (use a light box if required)
When you reach an edge of color, such as red meeting green—use a plastic template as a barrier to keep colors separated.
Position freezer paper on cutting mat
Then carefully cut out the design with a craft knife
It will look like this when complete
When cutting out your design, allow plenty of time. I find working with a scalpel best, however some people prefer sharp thin bladed decoupage scissors—use whatever method you are most comfortable with. You do not want to rush the cutting out as the lines will show up in your stenciling—jagged edging shows. If your work is neat, keep all the ‘cut outs’ separately for use later.
You want to keep the bottom half of the leaves for shading, so don't discard them
Iron your fabric and position your freezer paper stencil. On a mid heat, iron down the freezer paper. Do this carefully and ensure that all the lines are firmly ironed down as you do not want edges coming loose and lifting up when stenciling!
Set up your paints and pre-mix the colours you want to use. For this workshop, I used green and red and to create a darker green for shading, I simply blended the two together. Use a new brush for each color. There will be no need to rinse your brushes during stenciling.
Have plenty of paper toweling ready for blotting off excess paint from your brush. I can't stress this enough. Stenciling is not about 'painting' fabric, it is about building up layers of almost dry paint stippled into position - and these are very different things.
Apply some paint to your blotting tissue. Now blot off any excess paint. It is important that your brush remain somewhat dry. Remember that you are building up color. When applying paint to your stencil, buff the color in with quick circular movements—with stenciling you are building up color, almost as if you were dry painting. DO NOT SATURATE THE STENCIL.
Colour is blotted into the fabric with a dry brush. This allows you to go over areas and build up stronger color where desired, creating shading effects. If you saturate your brush, or if you did not iron down completely, parts of the freezer paper will lift—and this will lead to color seeping through and smearing. THIS IS TO BE AVOIDED. As below.When you reach an edge of color, such as red meeting green—use a plastic template as a barrier to keep colors separated.
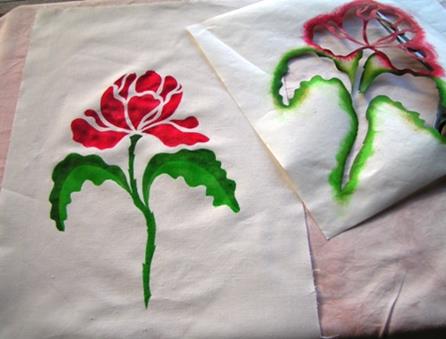
The stencil is now stenciled
Lift up your fabric. The painted stencil should be dry to touch and NOT leaking through the fabric. Leaking, seeping & blurriness mean too much wet paint! This image below is how your underside should look - essential dry to touch with no bleed through.
To create 2 color shading effects on a leaf, return to your earlier cut outs and re-position half of the leaf cut out back onto the flower, as shown below. Iron down the freezer paper piece on top of the paint. Iron down both leaf pieces.
Painting the darker hue: Use the same circular dry method of stenciling. You are only covering half the painted leaf—you are covering the half you do NOT want painted a darker hue.
Now, using a darker green, paint the top of the leaf
The freezer paper acts as a barrier to protect the color beneath
When dry, peel off the added freezer paper leaf pieces to reveal two tones of color
Leave the stencil until dry to touch
Then carefully peel back the freezer paper stencil as seen below
Allow stencil to dry
Turn over and iron on wrong side of fabric
Turn to right side and iron over stencil to heat set
Cover ironing board with pressed cloth or paper and heat set the paint by ironing on the back of your stencil with a dry iron set on cotton. Ironing on the back of your stencil sets the paint most successfully (3 -4 minutes). I use fine paper over the stencil to protect my iron against staining when ironing the front.
Now, what's stopping you from trying your hand at stenciling?
Simply click on this image to download your free
The Tulip Stencil Pattern
Instant PDF Download
Start Stenciling Today PDF Guide
------------------------------
Buy the full guide to this tutorial post
for just $1 USD
for just $1 USD
Instant PDF download
Subscribe to:
Posts (Atom)