Thursday 14 July 2016

Sweet 2016, Part 6: Opera Cake

Go ahead and cut me a slice of this gorgeous cake that just happens to be my own personal favorite. Oh yes, it deserves it's own dome! Opera Cake is deservedly popular all over Europe, although I have great difficulty sourcing it myself so I mostly dream and drool! For those of you who haven't tried it, it's made with layers of almond sponge cake soaked in coffee syrup, layered with ganache and coffee buttercream, and covered in a chocolate glaze. Mmmmm. I've been known to go on entire day trips with my DH to source this elusive cake (on my last bday) without success so I'm delighted to add it to my permanent Sweet 2016 display.

Here's where we are up to, quilt wise:
You can see that I'm still pinning my applique pieces onto the constructed paper pattern because I have far too many backgrounds and the indecision is driving me crazy. I've purchased 8 backgrounds and I already 4 possibles from my stash, so I'll just wait and decide at the very end.

Here's how I made my Opera Cake this month: at this stage, the fabric requirements are scraps from your chosen range. Here's my range for making up this month.
There's no getting around the always essential prepping of each little piece (and numbering too)
 I'm not adding tray fringes on all my trays, but I am fringing all my smaller domes and I'm fussy cutting to get the effect I want. I might even go back in and add some bead embellishments later to add some shine. I saw a member adding some Swarovski elements and it really lifted the applique, it looked fabulous so I might even add some 'bling' myself (whoever thought I'd say that?!)
 and this is what my fringe looks like once sewn into the dome. This is the only sewing you will do, as the dome is not stitched onto the background until the very end.
 Looking good
 Sticking down my pieces and keeping it all very neat and tight to the pattern, you don't want your shapes to 'grow'
I keep the chocolate background in one larger unit and applique the 'layers' on top - breaking down each slice would just be too fussy, even for me.
 My Opera Cake!
Understanding the pattern release schedule: anyone can join Sweet 2016 at any time and when they do, they will receive a new block each month from that point onward. The day they receive each new block will depend on the date they signed up and made their first payment. Everyone who starts Sweet 2016, starts at the beginning, Part 1. Specific blocks cannot be purchased out of turn. 

Whenever you choose to start this BOM, be sure to keep us updated on your progress by sharing your work over in our Sweet 2016 BOM Facebook Group, see you there!

'Sweet 2016' is my current Mystery Applique BOM
It's just $3.95 per month
Delivered digitally, to your email inbox each month

Wednesday 13 July 2016

WOW: Pomegranate Anyone?

WOW = WIPs On Wednesdays 
I've been taking many trips down memory lane this past week - you see I've been clearing out my sewing studio and making room to create the space I need to sew a wedding dress (but  more on that in another post!). It's been a good time for me to pull out those patterns that are three quarters finished and create a kind of priority list for my design WIPs. 

I found two Pomegranate wall hangings half completed (not counting the one above which is hanging in my lounge room) and they are really fabulous. I just love finding projects I am still in love with, it's a good sign. Anyhow, I will be releasing the pattern Pomegranate this week after WOW so if you've ever wanted to make it, don't forget to visit on Friday. Once again I will be allowing members to download new patterns to my online shop at the very reduced price of $4.80 for 48 hours - it's a small window that allows anyone who's interested to take part at a discounted price. 

And of course, today I'm working on a rose (what else?) themed wedding quilt which I expect to release next week. It's a busy time in my house and I can't wait to share more with you just as soon as I get to the next step.
What's Your WOW?


Tuesday 12 July 2016

Meet My Quilt: Peony Pride

I've been revisiting my stencil quilt patterns and oh boy, I'd completely underestimated how much stencil work I did back in the day! Well, just lately I've started receiving more and more interest in stenciling fabric so I thought now would be a good time to revisit my stencil quilts- by showcasing one each week. I hope that sharing my technique and passion, those of you who are interesting in trying this technique will be encouraged to give it a go. Applique is my true love, but there's no denying the allure of stenciling and what it can allow you to create.

Back in 2007 I wanted to create a modern quilt that had all the traditional elements I loved from those quilts of a bygone era - it had to be simple, be floral and make an impact. As a textile artist long before I was a quilter, I was completely comfortable with the idea of stenciling - even though those around me weren't so keen in my newfound interest and I couldn't find any like minded quilters to share my passion with. Not that this put me off, I was determined to see through my own personal stenciling challenges.

You see, I think that stenciling is ahead of it's time - way ahead, and I do think that one day it will get the respect it deserves- I hope it happens whilst I'm still quilting as I feel it's long overdue. It's especially odd to me as stenciling is not some new 'fad' but is up there with heritage quilting techniques - it's been with us since those very first New England quilts so there's no reason to avoid it for the sake of sentimentality.

I got the urge to create Peony Pride because I wanted to create a 'classic' quilt which was completely stenciled, and by doing so challenge the idea of what 'traditional' could mean for a quilt. I decided to just make a go of it and keep it simple. I designed Peony Pride in a single afternoon after flicking through my design journals and I have to say, looking on 9 years later, it still feels relevant and 'now' and yes, I would make it all over again. I still love it. 


Sunday 10 July 2016

Let's Stencil: Learn How Right Now

Let's Stencil: The Tulip
------------------------------
Materials:Cutting matt
Tracing pencil
Permanent fine marker
Craft cutting knife or scalpel
Sharp scissors
Paper towels
Stubby paint brushes for stenciling: I like using round brushes, size 8 & 10
Small containers for mixing up colours
Freezer Paper ( I use Reynolds Brand)
Acrylic or textile paints (textile medium if applicable)
Extra fabric for experimenting
Plain background to be stenciled, approx a 12 ½inch block, however the size isn't as important as this workshop is focusing on technique.
Whichever acrylic paint you choose, ensure that you use Textile Medium unless specified otherwise by the paint manufacturer.
Textile Medium helps paint adhere to fabric—for better setting, and is always recommended.
------------------------------

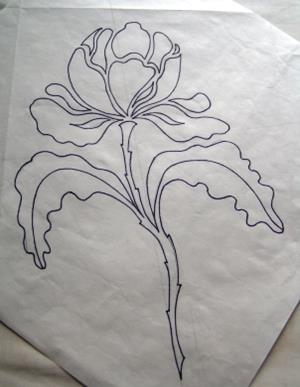
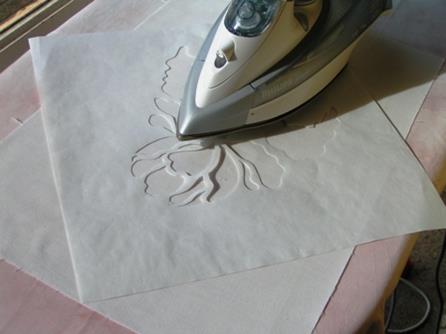
A stencil pattern is what you create when you cut out selected segments (holes) from a design according to a line drawing. Starting with the line drawing that you want to turn into a stencil, trace this line drawing onto freezer paper (use a light box if required)
  
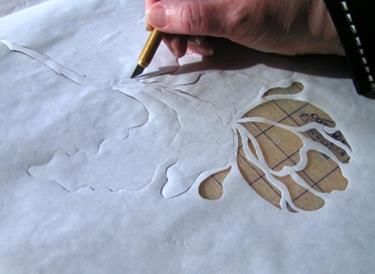
Position freezer paper on cutting mat 
Then carefully cut out the design with a craft knife
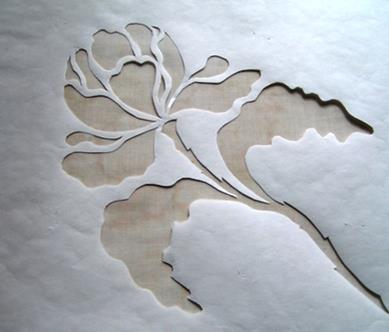
It will look like this when complete
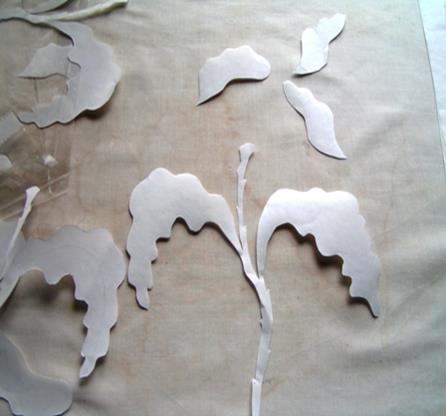
When cutting out your design, allow plenty of time. I find working with a scalpel best, however some people prefer sharp thin bladed decoupage scissors—use whatever method you are most comfortable with. You do not want to rush the cutting out as the lines will show up in your stenciling—jagged edging shows. If your work is neat, keep all the ‘cut outs’ separately for use later.
You want to keep the bottom half of the leaves for shading, so don't discard them
Iron your fabric and position your freezer paper stencil. On a mid heat, iron down the freezer paper. Do this carefully and ensure that all the lines are firmly ironed down as you do not want edges coming loose and lifting up when stenciling!
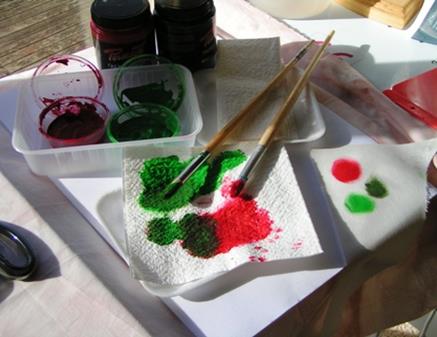
Set up your paints and pre-mix the colours you want to use. For this workshop, I used green and red and to create a darker green for shading, I simply blended the two together. Use a new brush for each color. There will be no need to rinse your brushes during stenciling.
Have plenty of paper toweling ready for blotting off excess paint from your brush. I can't stress this enough. Stenciling is not about 'painting' fabric, it is about building up layers of almost dry paint stippled into position - and these are very different things. 

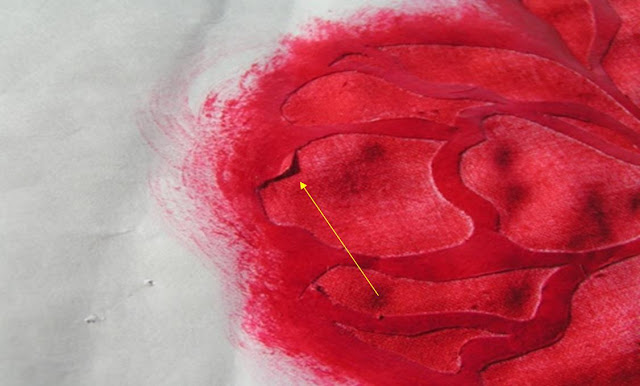
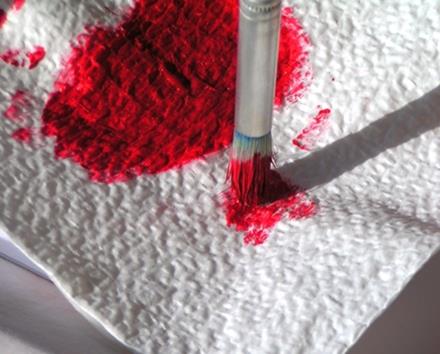
Apply some paint to your blotting tissue. Now blot off any excess paint. It is important that your brush remain somewhat dry. Remember that you are building up color. When applying paint to your stencil, buff the color in with quick circular movements—with stenciling you are building up color, almost as if you were dry painting. DO NOT SATURATE THE STENCIL.
Colour is blotted into the fabric with a dry brush. This allows you to go over areas and build up stronger color where desired, creating shading effects. If you saturate your brush, or if you did not iron down completely, parts of the freezer paper will lift—and this will lead to color seeping through and smearing. THIS IS TO BE AVOIDED. As below.
When you reach an edge of color, such as red meeting green—use a plastic template as a barrier to keep colors separated. 
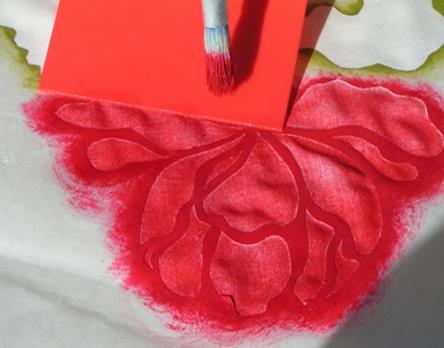
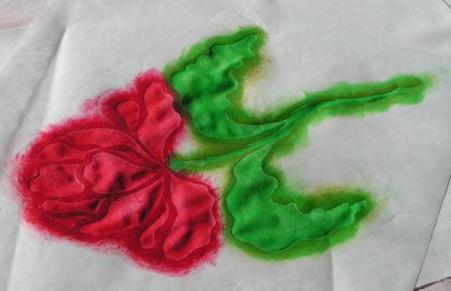
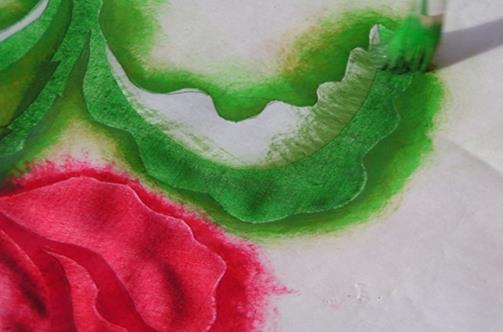
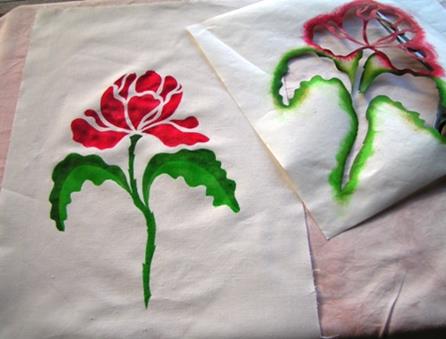
The stencil is now stenciled
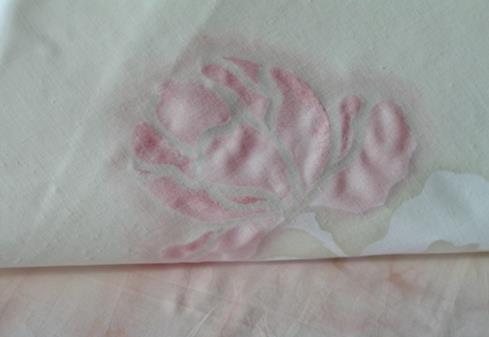
Lift up your fabric. The painted stencil should be dry to touch and NOT leaking through the fabric. Leaking, seeping & blurriness mean too much wet paint! This image below is how your underside should look - essential dry to touch with no bleed through. 
To create 2 color shading effects on a leaf, return to your earlier cut outs and re-position half of the leaf cut out back onto the flower, as shown below. Iron down the freezer paper piece on top of the paint. Iron down both leaf pieces.

Painting the darker hue: Use the same circular dry method of stenciling. You are only covering half the painted leaf—you are covering the half you do NOT want painted a darker hue. 
Now, using a darker green, paint the top of the leaf
The freezer paper acts as a barrier to protect the color beneath
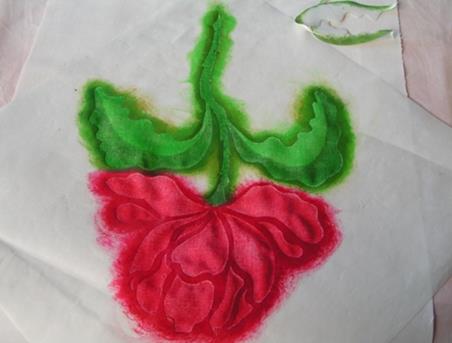
When dry, peel off the added freezer paper leaf pieces  to reveal two tones of color
Leave the stencil until dry to touch
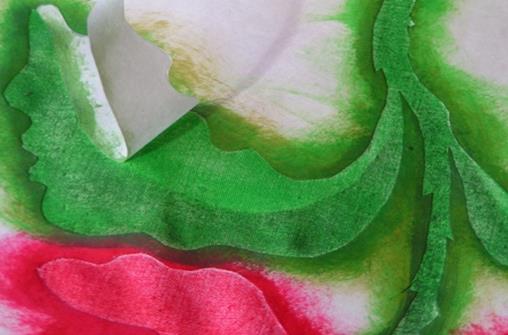
Then carefully peel back the freezer paper stencil as seen below
Allow stencil to dry
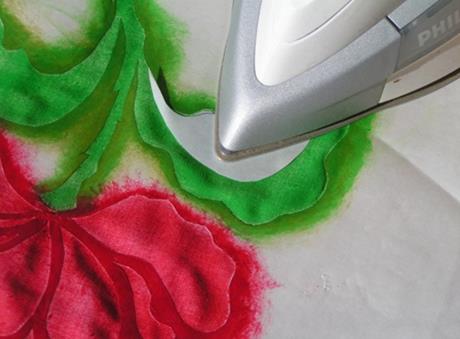
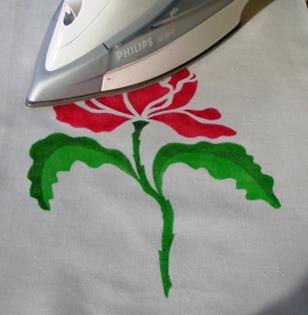
Turn over and iron on wrong side of fabric
Turn to right side and iron over stencil to heat set
Cover ironing board with pressed cloth or paper and heat set the paint by ironing on the back of your stencil with a dry iron set on cotton. Ironing on the back of your stencil sets the paint most successfully (3 -4 minutes). I use fine paper over the stencil to protect my iron against staining when ironing the front. 

Now, what's stopping you from trying your hand at stenciling? 

The Tulip
Free Download
$0.00
Simply click on this image to download your free
The Tulip Stencil Pattern 

Instant PDF Download

------------------------------

------------------------------
Start Stenciling Today PDF Guide
------------------------------
Buy the full guide to this tutorial post 
for just $1 USD
Instant PDF download 


Saturday 9 July 2016

Quilt Stenciling: Have You Tried It Yet?

Stenciling is not  new; in fact, it is one of the oldest and most authentic quilting techniques.

The European migrants arriving in New England brought the craze of stenciling with them to their new land. At that time, stenciling was popular on walls and furniture, eventually making its way onto textiles and whole cloth quilts. At it’s peak, the demand for stenciling saw ‘travelling stencil craftsmen’ make a living moving home to home with their stencil designs, working during the day in exchange for board and food. 

If only we could go back in time, I would love to unpack the settler’s luggage with them so I could see their beautiful stencil quilts and stencil patterns. We just don’t know what a rich legacy we’ve lost as the paints they used were either corrosive or food based and did not survive. From what little evidence exists from their walls and furniture, they were highly skilled and creative people and we’ve lost a lot. Today, stenciling is undervalued. This is a great shame as it demands workmanship and creativity and deserves respect as an authentic technique with a rich heritage.

Thanks to advances in fabric medium and paint, stencils made today will last as long as commercially printed fabric. And stenciling is so versatile, you can also achieve these results using paint sticks.

Do you have a journal full of design ideas?
Maybe you just want to try something new?

Stencilling allows you to really 'own' your quilt, from designing to technique and through to quilting. It forces you to really know your work whilst allowing you to run free of conventions. When I stumbled across stencilling, I was delighted with the results. Whilst not wanting to replace beautiful appliqué, the effect is beautiful and unique and allows a quilter to really make their mark in design and quilting. What a wonderful technique.

Wednesday 6 July 2016

WOW: Roses Galore!

WOW = WIPs On Wednesdays
I've got roses on my mind this year: rose fabric, rose lace, rose prints, rose fragrance and now, rose patterns. Oh yes, we're rose crazy in my house. I have three upcoming patterns, each one rose based and I have no idea which one to release next as I love them all equally, so I decided to take some time out and relax - by colouring in a page of my own rose head designs. It worked!

Today I'm 'tidying' up my WOW piles and clearing out my folios - those patterns 1/2 and 3/4 near finished need to be finally completed and released so I can move on with new pattern adventures. I also have a Nelke update I need to get done and am looking forward to have some new designs float out into the world very shortly.

I can't wait to share more with you, but for now, it's back to my roses and pattern making.

What's Your WOW?

Tuesday 5 July 2016

July Glad Tidings!

Happy Christmas in July!
I just received an invite to a dinner party celebrating Christmas in July. What? When did all this happen? It's July already and my head is spinning!Where has the first half of the year got to?! I've been in a bit of a daze since my mother's death and I'm shocked at how quickly the months are rolling by. I had planned on releasing a 'Christmas in July'  pattern, but look at me now, it's already  the 5th and I haven't even looked at the Christmassy side of my folio.
Have You Made It?
Last year I released 'Glad Tidings' as my free end of year pattern set and after Christmas, I released the table runner over on Craftsy for free where it's been downloaded every day since then. Last night I received an email alert like I usually do letting me know how many downloads there have been. Well, there's been a sudden peak in downloads and the totals are now over 6,000!
Do You Love It?
I suppose everyone else is more organised than I am - July is the perfect month to start a festive quilt. And you  know what? As much as I love each piece of Glad Tidings, I haven't even made one for myself! So here's my request, if you've made Glad Tidings (any item) please send me a pic, I'd love to see it all made up :)
Can I see it?!
And if you haven't you still can, the complete table runner is available for free over in my pattern shop.  You can download it by clicking here now. 


Related Posts Plugin for WordPress, Blogger...